Things we had access to already:
- A soldering iron and some electrical solder containing flux (borrowed from our flooded friend)
- A jig saw
- A paint brush
- A USB A to B cable
- Some 2″ by 4″ timber
- A short network cable
- A wireless router (someone in the club must have an old one knocking about!)
- Plenty of patients (only one of us had these, but that was just enough)
What we needed to buy:
LED light modules.
Superflux 5 LED Module
Sold in string of 6, we needed 105 modules in total so bought 19 strings (so we had a few spare). Total from ebay £32.11. Note, these are 5 LED, superbright editions. There were cheaper modules, but we wanted them to be bright. You can find them on ebay by searching for “5 SMD 5050 LED Module Light”
2017 update: Neil R from George village used a flexible 5 meter green LED strip light as an alternative to the modules above, which could be cut in to pieces at the required length. This means that each piece has to have cables soldered on (double the soldering) but offers great value and a very flexible design that allows you to adjust the size of the 7 segment digits. Make sure you buy bright LEDs (5050s are available) and look at the quantity of LEDs per meter. The more per meter the better the brightness will be!

Shifters

Texas TPIC6B595N
The Texas TPIC6B595N is a clever little chips, which act as switches for each of the led modules. Each Integrated Circuit (IC) can switch on and off up to 8 LED modules, so we went for one for each 7 segment display. As we have a total of 15 digits we bought 20, so we had a few spares. This was lucky, because we broke 1 while trying to fit it in to the chip socket. We bought ours from ebay, but delivery was very slow from China. I wish i had bought them from Farnell for £1.11 +VAT each module or proto-pic at £1.49 + VAT (proto-pic provided the shifter library on which this project is based). Total £30 including VAT and delivery.
Stripboard
A electronics circuit board, built using strips of copper. These boards are used to build the completed circuits and are *mega* easy to solder.

We need a minimum of 11 strips for each circuit board, but I recommend at least 20 so you have room to install the board. £9.18 bought 5 x Vero Style PCB Stripboard 64 x 95mm from ebay, which we cut in half!
2016 update – James T has emailed to tell me about the alternative 91x45mm Copper Prototype PCB Stripboard. – available from Ebay here. These look like they might be a bit easier to wire up, but are a few £s more expensive.
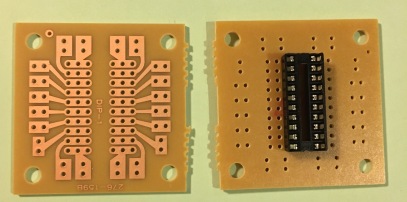
IC Socket
You will need some DIP 20 IC sockets, in which the shifters can be installed. These are soldered in to the circuit board and prevent the shifters from getting damaged by the heat.

20 x DIP 20 (20 female sockets) cost £2.80 from ebay.
Capacitors
Cheap and cheerful, and needed as part of the circuit.

You will need 20 x 0.1uF 100nF ceramic capacitors, £3.94 from ebay!
12 Volt Power supply
The LED modules run at 12 volts, and are advertised at 1 watt each. A quick look at my GCSE double award science book shows that V*A=W so, 105 modules divided by 12 volts = 8.75 amps.

We bought a 15 amp 12v CCTV PSU from ebay at £18.48. Advertised as low heat, this will need to be installed in a rainproof container!!!!
Important note: Don’t use a LED driver type power supply (an example of which can be seen in a picture here). While the LED drivers come in helpful waterproof containers (and therefore seem ideal), they contain a Modulation Control Unit, that affects the output so that it wont work the shifters in the circuit properly. Ian M tried to explain the reason that they don’t work to me, but I didn’t understand. Essentially they just don’t work, and you should go a for a generic switched power supply like the one shown in the picture above. Thanks to Stuart from Stalybridge St Paul CC for sharing his findings when testing with a LED driver PSU.
Arduino micro controller
The shifters control the LED modules, but they need something to send them instructions. The Arduino Uno is a fantastic little micro controller which does the job brilliantly, and is supported by a huge community of like minded people!
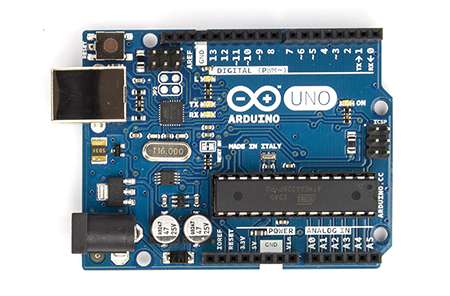
We bought one of these and a generic case for £30 from proto-pic.
Warning: There are many ‘fake’ or ‘compatible’ versions of this board on sale on ebay for a reduced cost. I have read about lots of problems with these boards and *strongly* recommend that you only use genuine boards.
Important note: When the Arduino is plugged in to the Raspberry, it must also be powered from a separate power supply, either using the VIN and GND pins or a 2.1mm center-positive plug (I bought one from eBay!). The Raspberry will power the Arduino via the USB port, but not with sufficient current to operate the digital pins correctly. Check the Arduino Uno specifications for more details. We powered the device using our 12v supply (the same one that powers the LEDs and the 5v stepdown).
Important 2016 update!!!! Several builds have reported inconsistent results from their circuits (sometimes working correctly, sometimes just not responding, sometimes corrupt). After significant testing with the help of Fred from Gator’s Pub Volleyball Club in the USA (woot, a build in a third continent!), we found that in order for the Arduino, circuits, leds and 5v stepdown to operate correctly together, they must all be powered by the same 12v power supply source. We think this is something to do with needing a common ground (if anyone knows the reason please use the contact us form to let me know). Do not use separate power supplies for the Arduino or the 5v circuit, it will not work reliably (or maybe not at all!).
Raspberry PI
We need a little computer that can host the web application used to set the score and pass commands to the Arduino micro controller. The Raspberry PI is ideal for this, it is very small and very very cheep!

We bought a model B raspberry pi (512mb RAM and network port), power supply, case and a 4Gb memory card pre installed with Linux from RS components for £53.87
12v to 5V power adapter
The shifters switch on and off the 12 volt supply to the LED modules, but the actual chips run at 5 volts. So we bought one of these converters to provide the 5 volt supply.

£4.69 from Amazon, and bobs your uncle!
Jelly Crimps
Jelly crimps are a useful way of connecting 2 or 3 cables together and are ideal for outdoor use.

I bought 100 of the 3 way crimps and 250 2 way crimps from ebay for about £25 in total.
Cable
50 meters of black, 50 meters of red and 50 meters of yellow 12 volt 11 amp thin-wall auto cable. £34.00 from Choice Cables on Ebay!
Outdoor quality ply
You will need one sheet of 12mm and one sheet of 6mm outdoor plywood at 2440 * 1220 (also known as marine ply).

We bought ours from a local building supplier (Hales of Drybrook, who gave me a nice discount), but you can get these from Wicks stores country wide! We spent about £50
Lenses and covers for 7 segment digits
There are three options which are detailed below for your consideration. Each require different tools, skills and patients!
Lenses and covers option 1 of 3 (2017)
Not everyone has access to a laser cutter, or commercial suppliers for acrylic plastic in the area are expensive. So Neil R from George Village used clear polycarbonate, masked out the seven segment digits and then over painted to create fantastic lenses. By using coloured LEDS he created the most fantastic (and low cost) digits. Lots of patients and a steady hand required for this design!


Lenses and covers option 2 of 3 (2016)
For the second build we did we used a full sheets of green plastic acrylic, which we then covered with a black acrylic cutout showing the seven segments (cut with a laser cutter). The Green Plastic lens we got from Trent Plastics, in 15 small sheets one for each number (£1.86 each + Vat + Delivery)
Tinted Acrylic – Thickness: 3.0mm – Size: 297mm x 210mm (A4) – Colour: Dark-Green-Tint

Lenses and covers option 3 of 3 (2013)
The original Westbury on Severn design for the first scoreboard. This is fiddly and not recommended unless you want to save money on coloured acrylic sheets.
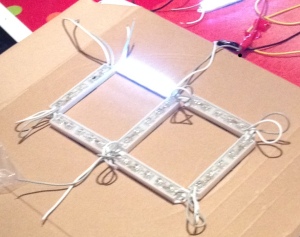
Coloured acrylic covers
In order to make the seven segment display, we bought some coloured plastic segments to cover over the LED modules. I found a trentplastics on ebay about bought 105 custom cut Amber plastic strips (101mm x 20mm) for £37.20 including transport. Make sure you specify 110 when you order them, as i got exactly 105!

Plastic covers
In addition to the acrylic strips, our Friend Ian also made us some black plastic covers to hold the acrylic strips, and some short plastic bars to mount the LED modules on.

Ian used his fancy laser cutter to make these for us, so we didn’t have to pay. Ian M bought 1.5 sheets of 1.6mm black plastic from 908ltd which is enough for 15 numbers and a little bit of spare. (£37 + £19 + Vat + Delivery) .
Alternative options
If you don’t have to have someone with a lazer cutter or the patients to mark out and paint the digits then you could try something with timber?. We tried routing the ply to hold the acrylic bars, but were not accurate enough. Perhaps you could make up a surround for the acrylic inserts using some thin timber or board? Another club that is building a board has used a 3D printer to create their digits.
Other bits and bobs
- 30 * connector blocks
- Some good quality outdoor black paint (we went for weathershield, which is expensive but we want it to last)
- Lots of screws
- 10 * 2.54mm male crimp pins (to connector our cables to the Arduino)
- 60 * 4mm x 12mm nylon spacers (rs components, rapid online or ebay)
- Some small cable ties
- Some vinyl adhesive lettering (from ebay).
- Some circuit lamination spray from maplins (to protect the circuits once we made them).
Another £60 in total
Total: Just under £400 (excluding the plastic covers). Other clubs in 2016 have managed to complete builds that include plastics for £600 to £800.
